Brightening Things Up
The new URL is up and running & hopefully all is going smoothly out there in cyberspace. The thing with tech is that, more often than not, you don’t find out that there’s a problem until after the fact.
I’ve been getting myself organized over the past few weeks – my basement growing area has been sorted out (after being a right mess for most of the winter), seeds have been ordered & received and I even have some green poking out of the soil:
There's one change this spring that I am particularly excited about. My grow lights are undergoing a bit of an upgrade.
When I first started growing from seed, I didn't have a nice sunny spot for them (and still don't) so I did as most do - set up a 4' shop light. It didn't take long for space to run short under that one light but I made due. In the meantime, I coveted the 3-tier Floralight stand from Lee Valley - but with a $500+ price tag, it was not in the budget. I did keep an eye out and about 4 years ago, I was lucky enough to find one on Kijiji for $85. Forget about negotiating a better price - this was a steal! I snapped it right up and after a bit of elbow grease, the chrome sparkled and you would be hard pressed to tell that it was anything but new. The owner also gave me at least 2 dozen fluorescent tubes - bonus!
I couldn’t have done without my light stand in the past few years and it’s allowed me to grow practically everything from seed. Since I first purchased it, my garden has grown quite a lot, with many more raised beds and new ornamental borders. Last season I was able to squeeze all of my seedlings under the lights, but only just. By late April/early May, I had to do some shuffling and early hardening off in order to make it work.
Each level of the light stand has a 2-bulb 48” fluorescent fixture (known as a T12) and 2 large trays which accommodate two seedling trays, placed lengthwise. I can also squeeze a few more cell packs beside the seedling trays, but it's not ideal as the plants that are not directly underneath the 2 light fixture are short changed.
The other problem with the existing setup was the fluorescent lights themselves – T12's should be replaced annually as their intensity declines rather rapidly, right from the start. The thought of discarding six 4’ fluorescent tubes every year, especially when they still “worked” (to the naked eye, I really couldn't tell that they were that much dimmer), didn’t sit well with me. I have yet to throw out any of the tubes that came with the stand although I have been switching out the old ones for new every 2-3 years (which I know is much too long) & simply setting aside the "old" tubes.
This year, I decided it was time to upgrade the lights and solve both of my issues – namely, that (1) the light coverage was too narrow (i.e. they didn’t cover the entire shelf area) and (2) the tubes required frequent replacement due to decreased intensity.
After doing a bit of research, I chose a 4’ - 6 light T-5 fixture. Although nowhere near as expensive as LED’s would have been, it certainly wasn’t cheap either, costing over $200 in our Canadian dollars for the one 6-bulb fixture. It did, however, include the bulbs – which some fixtures do not – a huge plus since the bulbs alone would have set me back around $90.
Let’s talk about the benefits of T5 fixtures over the T12’s (“shop lights”) that many of us home gardeners start off with. T5’s are 50% more energy efficient, have a lower mercury content and, depending on the bulb specifications, can last significantly longer – 30-42,000 hours vs. 18,000 for T12’s. There’s also the obsolescence factor - in many parts of North America, T12’s are being phased out so, eventually, we may no longer be able to purchase them.
But there’s one more important bit that really sets them apart - T5’s maintain 90-95% of their intensity for the first 20,000 hours of use while T12’s are down to 75% after only 5,000 hours. What does that mean in practical terms? I generally run my lights 16 hours per day from around February to the end of June. Let’s add 30 days to that as I’ll also run them intermittently over the summer if I decided to do succession plantings of lettuce, chard, etc. So that’s 16 hours x 180 days = 2,880 hours per year. Using these numbers, I would be hitting 75% intensity on the T12’s after only 1.5 years. With the T5’s, I’m still getting at least 90% after 7 years. A huge difference, no?
When it came to the size, I chose 6 bulbs because of the fixtures 20” width - this is an exact match to the trays on the shelf, meaning that the ENTIRE surface area of the tray would be covered. The only problem was that the shelf trays are sunken, with a 2” lip all around (this lip is what sits on the frame), making a portion of the 20" depth unusable:
In order to utilize the entire 20” width, I created a flat shelf using plywood. I covered it with shelf liner so that it was easy to wipe down and simply placed it on top of the existing trays.
This effectively doubles the usable space on the shelf, allowing me to place 4 trays on each level instead of 2:
I decided to purchase only one light fixture to start as I wasn’t sure how it would fit into the stand. Guess what? There was an unexpected hiccup. Did you know that 4 foot T5’s are not 4 feet long? They are, in fact, 2 inches shorter, being 46” rather than 48”. Well, that was a bit of a surprise and put a kink in my plan to attach the fixtures to the stand in the same way as the original fixtures (which are attached on either side using bolts that can be loosened so that you can easily move the fixture up or down).
I may have been able to MacGyver a solution, but decided to go with Plan B instead - hanging the fixture from the ceiling using clip rope hangers. These hangers are designed specifically for grow lights & they were a revelation - forget about fussing with "S" hooks and chains like my original shop light setup years ago! Hanging the light over the stand has actually worked out really well and it’s super easy to adjust the light up and down.
I’ve since ordered another light fixture for the 2nd level (it's currently in transit) and am planning on hanging it in a similar way, with the hangers running down the side of the stand. I’m not replacing the last fixture on the bottom of the stand just yet. With two new fixtures, I'll have a 10 tray capacity which should be more than enough for this year - and sure beats the 6 tray limit that I had before.
As for the old shop light fixtures & all those tubes, they will not go to waste. I will be re-purposing them in our garage where I have wanted to replace two existing ceiling fixtures - 8 foot (!) long T-12 fluorescent monstrosities, both of which burned out in the past year (and I refused to replace the bulbs, not that I could even find any that size if I wanted to).
I do hate wastefulness, so I’m quite happy that all those “still-functional-but-not-bright-enough-for-grow-lights” tubes that I set aside over the past few years will now be put into service once again. Sometimes, my miserly ways pay off 😀
P.S. As I was finishing up this post, the big thaw/rain hit. When I went to the basement to check on things, I discovered that we had a leak - and I don't mean a "grab some towels to soak up the wet spot" sort of leak. I'm talking about vacuuming up buckets and buckets of water. And wouldn't you know it - the water was coming in right where the grow stand was.
To make matters worse, I took down the insulation to see what was happening and the concrete behind the felt was dry, which means that the leak originates somewhere else and is likely traveling along the ground underneath the stud until it hits a low point and then spills out into the basement.
Thankfully there wasn't much damage - storing things in Rubbermaid bins instead of cardboard boxes is one lesson that I learned the hard way years ago when we had a furnace leak in our first house. We did, however, have to move a ton of stuff and so the basement is now in a state of chaos. We have the professionals coming in to take a look this week but I have a feeling that pinpointing where the leak is coming from is going to be difficult & involve some massive upheaval since it's likely originating in the finished area of our basement, concealed behind drywall. Not exactly how I wanted to start the growing season *sigh*.
I’ve been getting myself organized over the past few weeks – my basement growing area has been sorted out (after being a right mess for most of the winter), seeds have been ordered & received and I even have some green poking out of the soil:
 |
Onion seedlings coming up - this year I'm only starting a small portion in February,
with the majority being seeded in March as part of a timing experiment |
When I first started growing from seed, I didn't have a nice sunny spot for them (and still don't) so I did as most do - set up a 4' shop light. It didn't take long for space to run short under that one light but I made due. In the meantime, I coveted the 3-tier Floralight stand from Lee Valley - but with a $500+ price tag, it was not in the budget. I did keep an eye out and about 4 years ago, I was lucky enough to find one on Kijiji for $85. Forget about negotiating a better price - this was a steal! I snapped it right up and after a bit of elbow grease, the chrome sparkled and you would be hard pressed to tell that it was anything but new. The owner also gave me at least 2 dozen fluorescent tubes - bonus!
I couldn’t have done without my light stand in the past few years and it’s allowed me to grow practically everything from seed. Since I first purchased it, my garden has grown quite a lot, with many more raised beds and new ornamental borders. Last season I was able to squeeze all of my seedlings under the lights, but only just. By late April/early May, I had to do some shuffling and early hardening off in order to make it work.
Each level of the light stand has a 2-bulb 48” fluorescent fixture (known as a T12) and 2 large trays which accommodate two seedling trays, placed lengthwise. I can also squeeze a few more cell packs beside the seedling trays, but it's not ideal as the plants that are not directly underneath the 2 light fixture are short changed.
 |
| Each level comfortably accommodates 2 seedling trays. There's extra room along the sides for a few more cell packs but they generally suffer as they are outside of the fixtures ideal range. |
This year, I decided it was time to upgrade the lights and solve both of my issues – namely, that (1) the light coverage was too narrow (i.e. they didn’t cover the entire shelf area) and (2) the tubes required frequent replacement due to decreased intensity.
After doing a bit of research, I chose a 4’ - 6 light T-5 fixture. Although nowhere near as expensive as LED’s would have been, it certainly wasn’t cheap either, costing over $200 in our Canadian dollars for the one 6-bulb fixture. It did, however, include the bulbs – which some fixtures do not – a huge plus since the bulbs alone would have set me back around $90.
 |
Photo credit: Amazon.com |
But there’s one more important bit that really sets them apart - T5’s maintain 90-95% of their intensity for the first 20,000 hours of use while T12’s are down to 75% after only 5,000 hours. What does that mean in practical terms? I generally run my lights 16 hours per day from around February to the end of June. Let’s add 30 days to that as I’ll also run them intermittently over the summer if I decided to do succession plantings of lettuce, chard, etc. So that’s 16 hours x 180 days = 2,880 hours per year. Using these numbers, I would be hitting 75% intensity on the T12’s after only 1.5 years. With the T5’s, I’m still getting at least 90% after 7 years. A huge difference, no?
 |
| The light has two switches, one controls the two middle lights while the other controls the 4 bulbs on either end. |
 |
| This photo illustrates the problem with the existing shelves & the
2" lip. This lip is why only two 10"x20" cell pack trays will fit on each level |
 |
| Plywood shelf covered with shelf liner gives me a nice flat, 48" x 20" surface for my cell pack trays |
 |
| A 20" wide grow light and a 20" wide shelf doubles the amount of usable space on each level |
I may have been able to MacGyver a solution, but decided to go with Plan B instead - hanging the fixture from the ceiling using clip rope hangers. These hangers are designed specifically for grow lights & they were a revelation - forget about fussing with "S" hooks and chains like my original shop light setup years ago! Hanging the light over the stand has actually worked out really well and it’s super easy to adjust the light up and down.
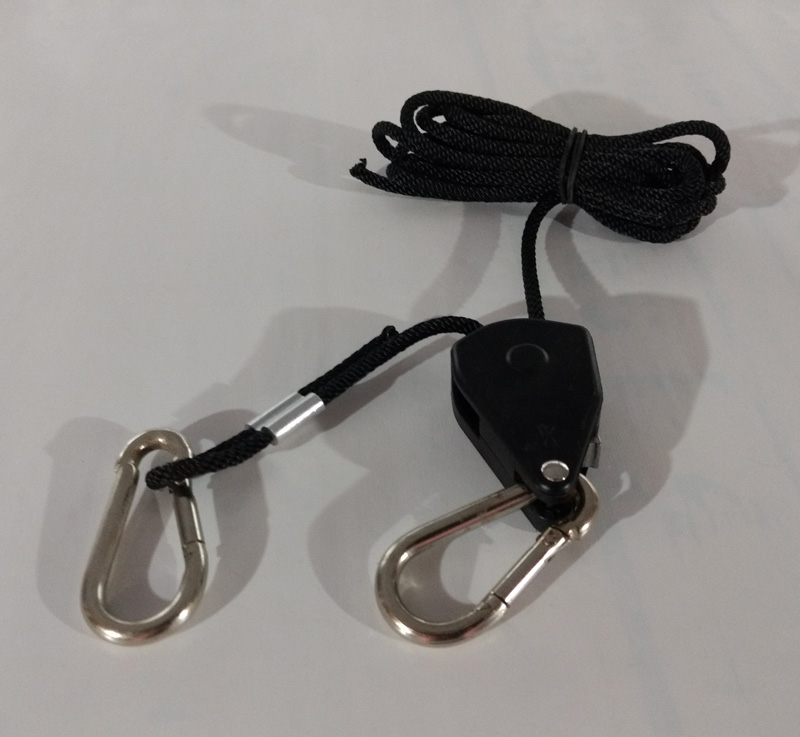 |
| The specific ones that I purchased can hold up 150 lbs per pair, which is more than enough for the light fixture which weighs in at just over 20 lbs. |
As for the old shop light fixtures & all those tubes, they will not go to waste. I will be re-purposing them in our garage where I have wanted to replace two existing ceiling fixtures - 8 foot (!) long T-12 fluorescent monstrosities, both of which burned out in the past year (and I refused to replace the bulbs, not that I could even find any that size if I wanted to).
I do hate wastefulness, so I’m quite happy that all those “still-functional-but-not-bright-enough-for-grow-lights” tubes that I set aside over the past few years will now be put into service once again. Sometimes, my miserly ways pay off 😀
P.S. As I was finishing up this post, the big thaw/rain hit. When I went to the basement to check on things, I discovered that we had a leak - and I don't mean a "grab some towels to soak up the wet spot" sort of leak. I'm talking about vacuuming up buckets and buckets of water. And wouldn't you know it - the water was coming in right where the grow stand was.
 |
| One issue with having the new fixture hanging from the ceiling is that the stand no longer becomes "portable". The leak required that I move it so the onions are now under the "regular" lights. |
 |
After the leak: My exploratory search behind the insulation
& shop-vac at the ready just in case
|


It sounds like you've got a great set up which enables you to get things started much earlier than you otherwise would. I'm sorry to hear about the leak, I hope you can get things sorted quickly and without too much upheaval. I always say it's one step forward and two steps back, there always seems to be something that needs seeing to in a house.
ReplyDeleteSo true - I was just thinking that this morning...just when you think things are going well, you get hit with a curve ball. I do hope the leak is relatively easy to find and resolve - I'm actually thankful that our issue is only water. A neighbour had their septic system back up into the basement this past fall - what a disaster that was!
DeleteOh Margaret sorry to hear about your leak....most frustrating and I have learned the hard way about storage too. I enjoyed learning about your new lights and am always fascinated with how folks start seeds indoors.
ReplyDeleteThanks Donna - seeing that bit of green pop out of the soil never fails to excite! So many things were ruined in that first house, simply because they were stored in cardboard boxes. Well, at least I learned my lesson - my parents had a similar incident but they continued to keep their stuff in cardboard (and they did end up regretting it!)
DeleteI'm still using T-12s for most of my seed starting activities. I haven't yet figured out a way to retrofit the T-5 units to my stand. I am somewhat lax about changing the bulbs too, though the seedlings haven't seemed to mind too much. I do hope you get the basement water situation figured out. Like you, we learned to put things in plastic storage bins too. We have water in the basement now due to all the rain, but it's not that bad and is draining away.
ReplyDeleteWell, I'll definitely let you know how things work out with the T5's - the specs sound great, but we'll have to wait and see if the actual results are any different. At the very least, I won't feel guilty about using them year after year without replacing them ;) Everyone I've talked too seems to have had some experience with a leaky basement - but it's something you don't really think about until it actually happens. I'm hoping we can get this dealt with quickly - the fact that I'm a bit of a pack rat & there is a ton of stuff down there certainly doesn't help matters!
DeleteHi! It is great to read a blog report from yu! Your new grow lights are just wonderful! I gave my small little set up away when we moved here. Now I am wondering if I should have done that! LOL In our house in Michigan we had a water leak. Nothing worse than that and hope you can get it taken care of with little effort and cost. Nancy
ReplyDeleteThanks Nancy - maybe you can "borrow" your grow lights back in the spring ;) I hope that this leak is resolved relatively painlessly too although I have a feeling that it's going to be a right pain, both in terms of the mess and in the pocketbook.
DeleteWow, that's a fabulous new light setup! 10 trays is a lot of seedlings. You're off to a great start to the new gardening year.
ReplyDeleteI can commiserate with the water issue. We don't have a basement but we do have large area in part of our crawl space where I keep some things for the garden. We had a pipe leak a while back and I didn't figure it out for at least a couple of weeks until the water had migrated from the area of the leak to the space where I kept things. What a mess. I hope your fix turns out to be an easy one!
Thanks Michelle :) I'm so excited to use the new setup & it will be interesting to see if it makes a noticable difference in how the seedlings do. The dang leak certainly has dampened my enthusiasm, though. We had some water seepage a few years ago that simply involved injecting something into the concrete (which was exposed as well, so no drywall to deal with). I somehow doubt that the fix will be that easy this time round.
DeleteLove the new light set up! My basement is full of lights, too. So glad the leak didn't damage everything. What are you growing?
ReplyDeleteThanks Tammy :) So far I only have the alliums started, but today I'm getting to the peppers, eggplant & yet another variety of Echinacea.
DeleteWe have some growing lights in the house that we need to get sorted out so we can make a start too.
ReplyDeleteThe leak has delayed things but I'm hoping to catch up today, even though that area of the basement is still in disarray.
DeleteWhat a great set up! I swear, first thing I do after I retire (not that I'm counting the days) is buy some grow lights.
ReplyDeleteOh, you will have so much fun when you do!!
DeleteI went through the same thing as you, doing the plant shuffle from outdoors to indoors because there wasn't enough space under the lights. I also started with a 4 foot shoplight with 2 T8 bulbs, a slight improvement over the T12, and they just weren't up to the job. The light was modified to hold 4 bulbs and 2 of them were GroLux - a vast improvement. Still the bulbs, especially the GroLux, lost effectiveness after a year. This light unit is a vast improvement. Just in wattage alone, you are going from 2 40W bulbs to 6 54W bulbs. With the increased efficiency you are probably looking at about 5 to 6 times as much PAR (photosynthetically active radiation). That's a huge step up and you should have no problem putting 5 trays, if you can fit them, side by side, and raising the light high enough to cover all of them. You may even be able to shorten the time they are on by several hours.
ReplyDeleteIt looks lke you are using Reflectix for reflecting the light back. I tape it to foam panels or cardboard to make removable panels. A few weeks ago I posted about the LED lights and photosynthesis, don't know if you caught that, but you might find some of the info useful. I know this setup will be a vast improvement over the old T12's, you should see a huge difference in the seedlings.
Thanks so much for the encouraging words - you have made me all the more excited to see a big :) change in my seedlings this year.
DeleteYes, I am using Reflectix - when I saw your post on that, I thought - what a great idea! - and then immediately added it to my shopping list. I had taped them directly to the plastic insulation barrier but I had to take them down when I removed the insulation during my leak inspection. I like the foam board idea - I think I'll do that. I've been offline for a few weeks, so I don't think I caught your post on LED's - I'll be giving it a read today.
That's a fantastic setup, you'll have so much room now. And your onion seedlings look like they're off to a great start. Seeing everyone start their seeds makes it feel like spring is just around the corner.
ReplyDeleteThanks Phuong - yes, it's a great feeling starting seedlings (and seeing those started by others), especially when we are still in the midst of winter.
DeleteWow, you are a true professional! It's wonderful that you grow almost everything from seed. I've been doing more of that during the past few years, but I need to step up! Your new blog name and design are wonderful, by the way!
ReplyDeleteThanks Beth :) I love growing from seed - such a feeling of accomplishment! This year, I received a germinated dwarf oak tree seed when I went to a local Master Gardeners meeting. I sowed it as soon as I got home and am so excited to see what comes up!
DeleteYour new set up sounds marvellous - or it will be once that pernickety leak has been plugged! Sadly, I don't have room for anything like that although I have been wondering about trying some of Ikea's growlights that were introduced last year. They might let me make a small earlier start on things but otherwise seeds have to wait until I can move the seedlings onto my balcony within a couple of weeks of germination, ie, warmer air! We're under snow this week, apparently the cold weather will only last one week, so I'm making the most of it and doing a bit of spring cleaning! Good luck in finding the source of the leak, hope it all goes smoothly for you.
ReplyDeleteThanks Caro! I just took a peak at the Ikea growlights & they look really promising - I didn't know they even existed (which I suppose is not a surprise since they aren't available here yet - we always seem to be a bit behind). You'll have a TON of fun growing under lights - once you have them, you'll be wondering how you did without!
DeleteWe have been rather warm lately (for us!) but had quite a snowfall last night so it's back to white outside.
Stumbled on this trying to update my own 3 tier light stand from Lee Valley. I've had it more years than I can remember, and don't think I really understood the limits of the T12 lights. It looks like Lee Valley is now selling the stands with T5 LEDs. I wish they sold the ballast. Do you think I could use T8 or T5 florescent bulbs in the original ballast?
ReplyDeleteUnfortunately, you cannot use either of those with a T12 fixture by simply swapping out the bulbs. If I recall correctly, I did find a site (I believe someones blog) where they kept the same exterior housing of a shop light but replaced the electrics in order to use T5's. For me, it was a bit too complicated a process and wouldn't have solved my light coverage issue. I would suggest googling "how to replace T12 with T5" to see what you come up with. Good luck!
Delete